Before Photoshop CS5, transforming a photo into a realistic-looking painting was quite tricky. Now that CS5 has been released we now have some new tools to help achieve this effect a bit more realistically. In today’s tutorial we will demonstrate how to use Photoshop CS5’s new Mixer Brush tool to transform a photo into a masterpiece in minutes.
Step 1
Let’s get started by first opening a photo. You can download the photo we used here. Otherwise, just open any photo you would like to convert to a painting.

Step 2
Duplicate the background layer by dragging it to the "Create New Layer" icon in the layer palette or by Pressing Cmd (Ctrl) + J.

Step 3
Now, click and hold the Brush icon in the toolbar then select the Mixer Brush Tool and release.

Step 4
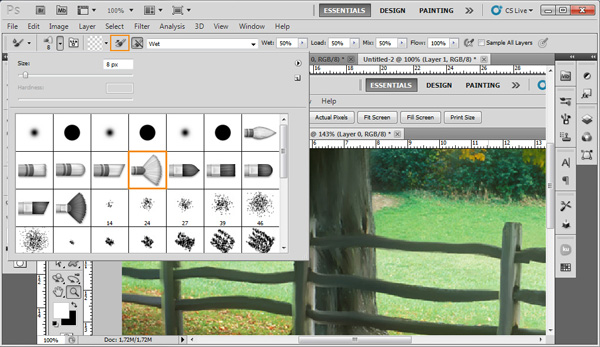
While selecting the Mixer Brush, right click on your image to display this menu. You can also go to Window > Brushes.

Step 5
Choose the brush as shown below.

Step 6
Click on the icon in the top left of the brush parameters toolbar or press F5 to open the Brush dialog box.

Step 7
After the dialog has opened, enter the following parameters.

Step 8
If you are using a tablet, check the "Airbrush" Option as I’ve done here.

Step 9
Choose a fairly large sized brush, I’ve chosen 177 px but you can choose a larger or smaller one if you like. Let’s focus on the tree for now. Start moving your brush in circular movements on the right side of the tree. You can see how this works in this animation. Once you've finished, you should have something that looks like the image below.

Step 10
Use the same technique on the left side of the tree. Feel free to adjust the size of the brush as needed to paint in some details.

Step 11
Now let’s start working on the trunk of the tree. This time, we will use another technique, which is to start from a point and drag the brush along the trunk. Be careful to pick a brush that is the same size as the trunk and then vary it to work with the details. For this step, I used two brushes as shown below.

Step 12
Your image should now look similar to below.

Step 13
Now let's work on the fence. For this I used the same brush as in Step 11 using the same technique.

Step 14
Your image should now look similar to below.

Step 15
Now let’s work on some additional areas. Keep making circular movements with your brush until your image looks similar to below.

Step 16
We can now start on the grass. To do this, we need to change the stiffness of the brush to 98% to get a more diffused effect. Perform some more circular movements on the grass varying the brush size to give it more detail.

Step 17
Your image should now look similar to below.

Step 18
Now select the Sharpen tool and select a brush size of 400 px. Apply it to the image as shown.

Step 19
Now go to edit, then fade the Sharpen effect, to 45% as shown.

Step 20
Your image should now look similar to below.

Step 21
Now let's apply an Artistic filter, go to filter > Artistic > Dry Brush, and enter the settings 0, 10, 3. The, go to Edit > Fade Dry Brush and enter 35%.

Step 22
Apply a surface blur, go to filter > Blur > Surface Blur, and enter the settings 3, 4. Then go to Edit > Fade Surface Blur and enter 15%.

Final Image
Take a look at the final image.

Use the Mixer Brush in Photoshop CS5 to Turn a Photo Into a Realistic Painting
![Use the Mixer Brush in Photoshop CS5 to Turn a Photo Into a Realistic Painting]() Reviewed by Rock
on
May 23, 2017
Rating:
Reviewed by Rock
on
May 23, 2017
Rating:

No comments: